 |
Friday, November 19, 2010
Silhouette Skylines

Radial Name Designs

This was the first project I had the 6th graders do. They howled and complained that it was too hard, but in fact, it wasn't, and they ended up doing a wonderful job! The process is simple; however, if the students are not listening and following directions, it is easy to mess up.
You will need: rulers (the wooden kind work the best), pencils, black crayons! (other colors will not work!), 12x12 white paper, markers
Steps (I will post pictures of these soon)
1. Fold the paper in half in a triangle
2. Open the paper and fold it into a triangle the other way. There should be 2 creases making an X
3. Fold the paper in half both vertically and horizontally (Hamburger and Hotdog). There should be 4 creases all stemming from the middle making a star.
4. Fold the paper back up along all the creases making a triangle.
5. Open it so you see 2 triangles and write your name from top to bottom with a black crayon (pencil first for students) **It must touch the bottom edge and the top crease or else it will not work!!!
6. Fold the triangle up with the crayon name on the inside; use the ruler to rub the outside of the paper; this should transfer the black crayon to the other side. It won't be perfect but if you can see to redraw with a crayon, it should be fine.
7. You have transferred the name upside down and backwards, trace it with a black crayon. The letters again should be touching the top edge and the crease, connecting with the letters you have already drawn. We are making a continuous line. I tell the students if they can read their name, they are doing it correctly!
8. Keep transferring the letters to each triangle on the paper. DO NOT re write any letters, you should only be using the ruler and black crayon to transfer them.
Monochromatic Monkeys
 |
| Third Grade Monkey display. It says "If you don't know what 'MONOCHROMATIC' means, ask a 3rd grader! |
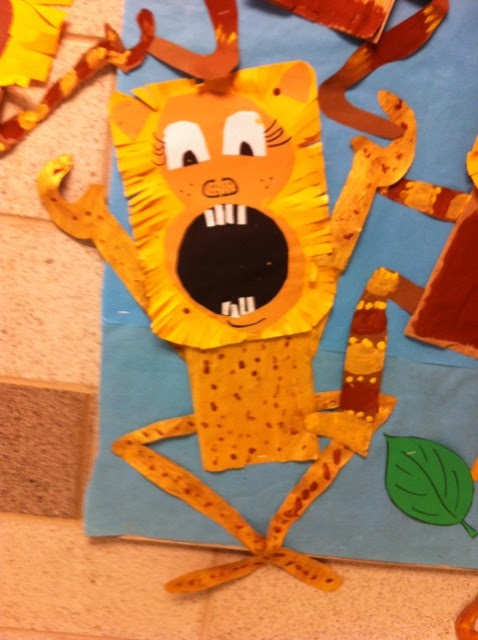

These Monochromatic Monkeys (or some kids said they look more like lions) were for the 3rd graders; it took them about 4 or 5 classes to complete. With a different group of students, it might have taken less time. We talked about "monochromatic colors" and about color families. We started with a half sheet of yellow paper for the head, then we used brown paper and drew 2 circles (or the letter 8) for the face. We drew half circles for eyes, circles for mouths, squares for teeth, and the letter "c" for the nose. It is so much easier for the kids to follow along if I use shapes they can relate to! After we finished, I taught the kids how to fringe along the yellow edges for hair. The body is a lunch bag. This is how we drew the arms and legs:
 |
| The arms are just letter "C's with sticks coming out, then we drew bubbles around them to look like arms |
 |
| The legs are letter "Z's" with bubbles drawn around them |
Afterwards, we finished by painting. We mixed yellow with black and white to get the monochromatic colors (ok, we used brown too...)
Friday, November 12, 2010
Ms. Lightning Bug's Bug Jars!
4th Grade Bug Jars


Supplies: Newsprint, White, Blue, and Green Paper, "Bleeding" Tissue Paper, permanent markers, scissors, glue, paintbrushes, and water
"Bug Jars" was a 4th grade lesson. This is a tough group of students to impress... if they think a project is boring, they will not stay on task. Luckily they really liked drawing bugs, even the girls, who drew butterflies. I checked out some bug books in the library and also printed some images from the internet and passed them out to each table. Because they are constantly "messing up" and throwing good sheets of paper away, I had the students practice drawing the bugs on a newsprint before drawing them in the jar. They then drew the jar, cut it out, and drew their bugs inside. Afterwards, they outlined the bugs in black permanent marker (**it is important to use permanent markers because later when you use tissue paper, any other markers will smear!) They used bleeding tissue paper, water, and paintbrushes to put color on their bugs, they glued them onto a piece of paper, then I taught them how to fringe paper with scissors for grass. It took a while and some turned out better than others but overall, I was very happy with the success of this project!
Subscribe to:
Posts (Atom)